These are the blog archives from my old blog, preserved for posterity. Allow me to direct you to the new mistercameron.com. Enjoy.
Accessing Raspberry Pi GPIO Pins (With Swift)
You can do quite a bit with GPIO (general purpose input/output) pins on devices like the Raspberry Pi and Beaglebone. Here I’ll show you how to set it up to perform a couple of simple tasks, like blink an LED and read the temperature from temperature sensor called the DS1820B. If you don’t know much about electronics, that’s OK – there’s nothing major here, just a few points to follow as you go along. I’ll explain them in further detail at the right time.
Setting Up
These examples will focus on the Raspberry Pi, because that’s what I have easiest access to, but with some minor modifications they could work with a Beaglebone black. At the time of this writing, Swift is available for the Raspberry Pi 2 & 3, including package manager. You can download the Swift 3.0 binaries from Joe Bell’s Jenkins build if you don’t wish to compile Swift yourself. I personally like to keep a couple versions of Swift builds and symlink to the “current” one, with ~/swift/current/ (a symlink) listed in my bash profile’s $PATH list. That way I can change the symlink at will.
Side note: I work with both Raspbian and Xenial (Ubuntu/ARM). At the time of this writing, there appears to be some issue getting the 1wire interface to work on Xenial, though I am able to compile swift completely, which proves difficult on Raspbian. Basic functionality, like blinking LEDs, seems to work on Xenial, but I haven’t had an opportunity to try other interfaces. On the surface level they appear available and usable.
Sanity + Smoke Test
The ribbon cable between the Raspberry Pi and the breakout board can be inserted either way (right or wrong), so it’s important to do the check first. Hook up your jumper cables from the 3.3 or 5V pin on the breakout to the breadboard row containing your 220Ω resistor. Following this diagram below. Make sure your LED is inserted properly (long let at positive). Click for full-sized view.

Next, connect the jumper from 3.3V to the row corresponding to GPIO Pin 17.
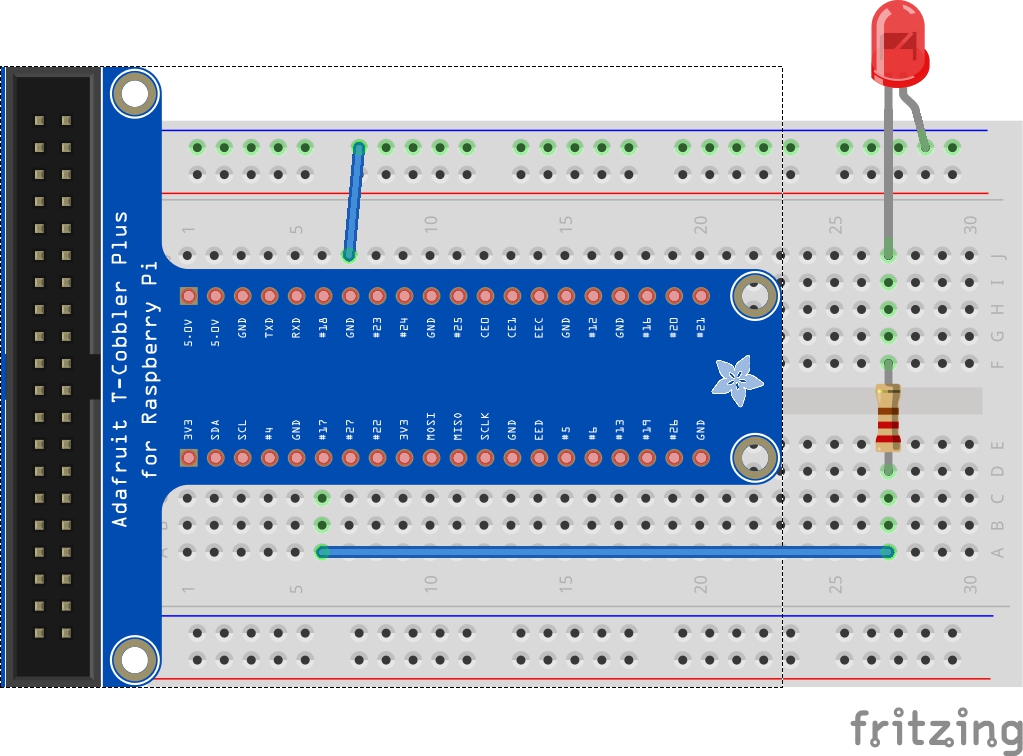
It may be worthwhile to install WiringPi so you can test GPIO connections via the command line rather than compiling swift every time. In our example above with pin17 connected to the LED:
gpio mode 17 out
gpio write 17 0
gpio write 17 1
This should work for you, but I did run into some issues from time to time where it simply refused to work properly (I’m sure I did something wrong!).. You should see the LED turn on.
SwiftyGPIO
Check out SwiftyGPIO and see how the examples are configured. It’s quite straightforward. Using this, we’re going to build on them to read from a 1-wire digital temperature sensor (DS18B20). Let’s get started configuring the Pi to user the 1-wire interface.
First, a brief overview. You define the GPIO type by passing an enum value for your hardware. In this case the .RaspberryPi2 applies to both the Pi2 and Pi3. We’ll go with that. We’ll then keep a reference to the GPIO #17 pin, as in the above smoke test. Note that this is the actual GPIO number, not the number as it would apply to the pin number on the circuit board.
let gpios = SwiftyGPIO.GPIOs(for:.RaspberryPi2)
var gp = gpios[.P17]!
You set the direction (either IN for things like sensors, or OUT for things like LEDs)
gp.direction = .OUT
and finally turn on the LED,
gp.value = 1
From the SwiftyGPIO examples, let’s look at what a continuously blinking LED program would look like, modified for our hardware example.
import Glibc

let gpios = SwiftyGPIO.GPIOs(for:.RaspberryPi2)
var gp = gpios[.P17]!
gp.direction = .OUT

repeat{
gp.value = (gp.value == 0) ? 1 : 0
usleep(150*1000)
}while(true)
You can include the SwiftyGPIO.swift file next to your main and compile the whole with swiftc *.swift && sudo ./main
The programming really isn’t very hard, so let’s move on to our temperature sensor.
Hardware Config
First you need to enable GPIO on the Pi, and to do that you need to write some configs to the boot config file. If you’re running Raspbian (and expect to use pre-build binaries), you’ll need to edit the /boot/config.txt file; if you’re on Xenial/Ubuntu, it’s /boot/firmware/config.txt .
add this line to the end, if it’s not already in there:
dtoverlay=w1-gpio,gpiopin=4
Reboot the machine.
You’ll then need to check that everything worked just fine
sudo modprobe w1-gpio
sudo mod probe w1-therm
cd /sys/bus/w1/devices
ls
cd 28-{rest_of_id_number}
ls
cat w1_slave
The output will look something along these lines,
b9 01 4b 46 7f ff 0c 10 f2 : crc=f2 YES
b9 01 4b 46 7f ff 0c 10 f2 t=27562
That t= value is degrees C * 1000. We’ll end up parsing it in the readTemp program.
See this set of articles for further details.
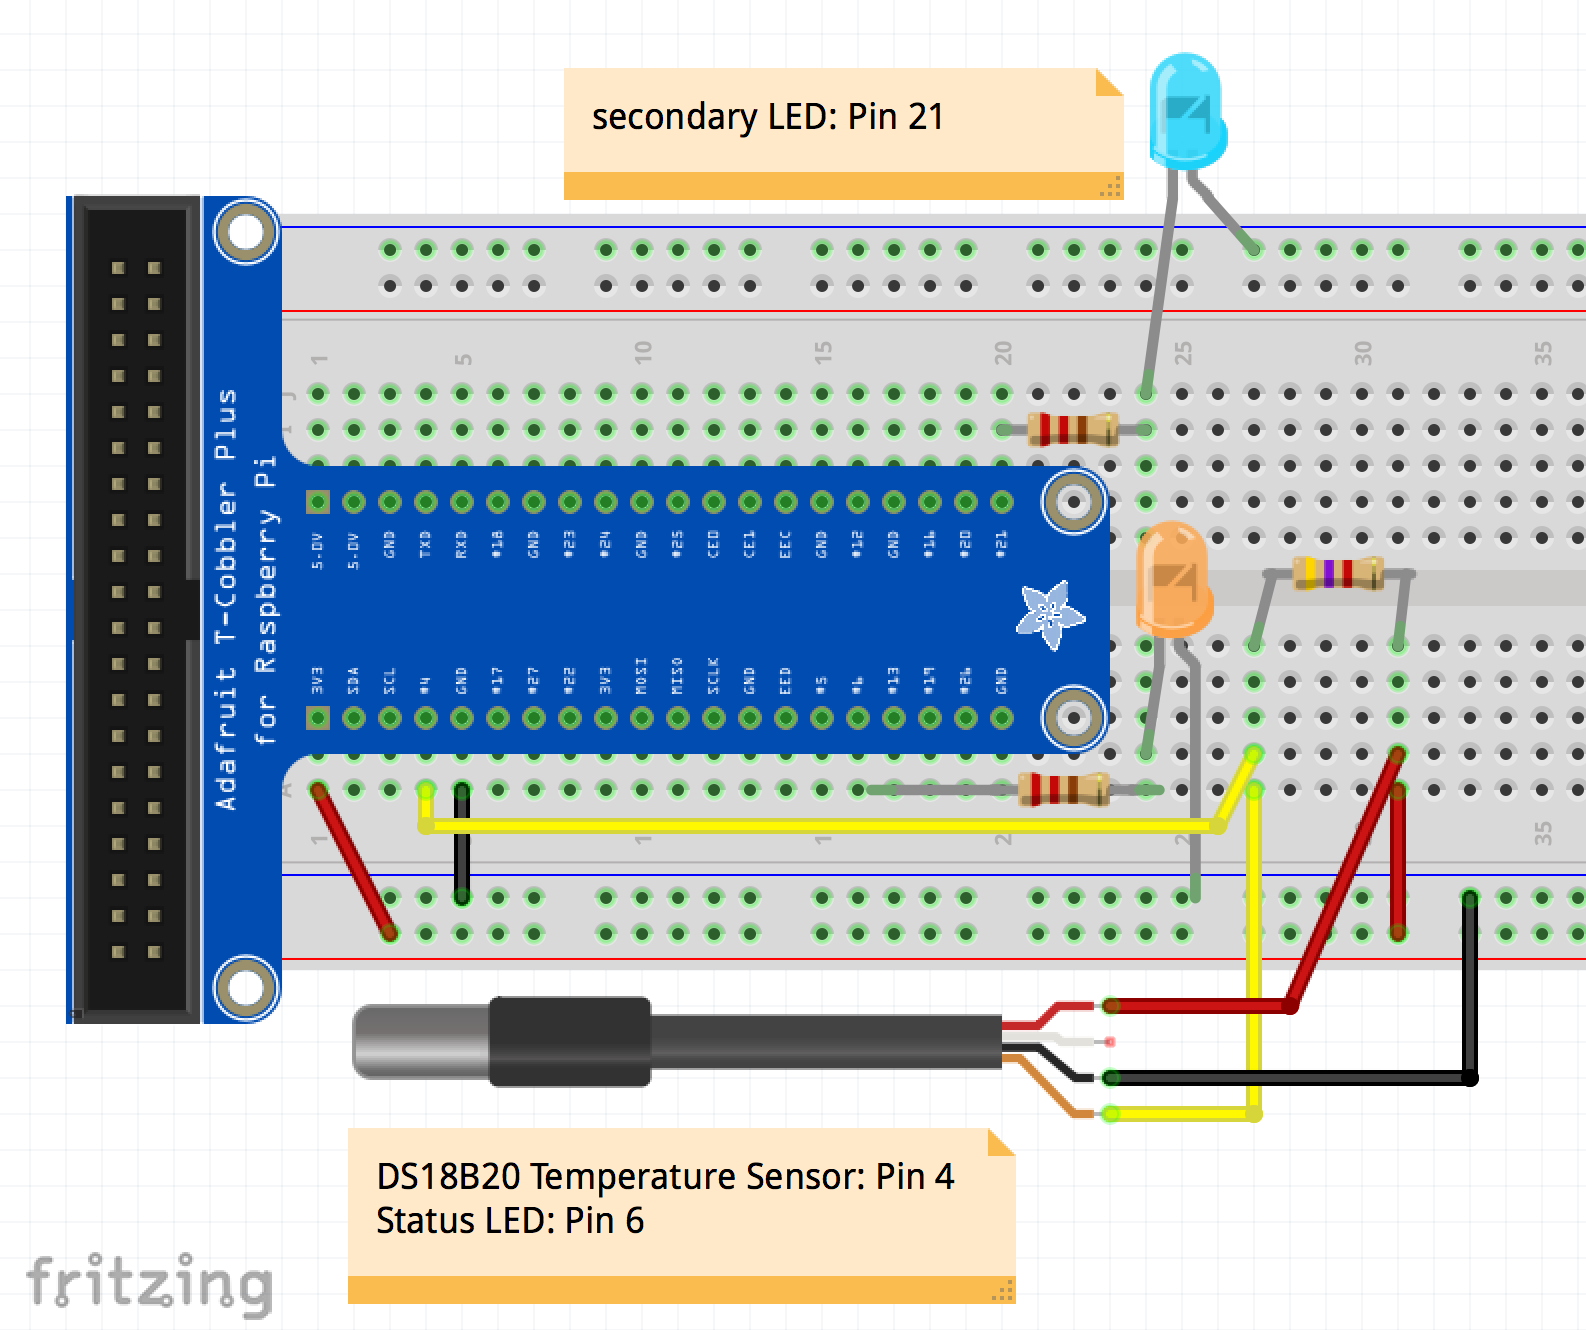
Temperature Sensor
Here’s a little program (http://github.com/iamcam/swiftyArm/readTemp) with 1-wire temp sensor (DS18B20) and two status LEDs. Follow the wiring diagram below. I’ve included the Pin numbers on labels because sometimes the Fritzing pin numbering can be a bit blurry. The gist of this little project is to perform a temperature reading whilst making an LED blink on a separate thread
Assuming you have a functioning Swift build on your Pi, you should be able to download the repo, build the readTemp project with package manager, and run the output.
$ swift build
Cloning https://github.com/uraimo/SwiftyGPIO.git
HEAD is now at d6fd508 Updated package name, new release
Resolved version: 0.8.2
Compile Swift Module 'SwiftyGPIO' (4 sources)
Compile Swift Module 'readTemp' (3 sources)
Linking .build/debug/readTemp
Then execute it:
$ sudo .build/debug/readTemp
Some lights will blink and partway through, the read status LED will illuminate and the temperature will print out to the command line,
27.562 °C / 81.6116°F
And that’s about it. Besides getting a stable Swift working, this project wasn’t very hard. Getting the wiring set up properly is probably the most difficult. Surely in a few months time we’ll have a stable Swift that’s less of a moving target.
Compile Swift 3.0 on Your ARM computers (Raspberry Pi, BeagleBone Black, etc)
I often write these blog posts in part to remind my future self how I did something as well as for the benefit others. Today I’m looking at what’s involved with compiling Swift for ARM devices, namely the popular Raspberry Pi. While these are meant for the RPi, they should also apply generally to devices like the BeagleBone Black. Before you get started, you should be reminded that Swift3 is very much an alpha-level project, especially on ARM devices. There are times when swift won’t even compile properly, or even if it does compile, there could be issues running it smoothly. armv7 devices (BeagleBone Black, Raspberry Pi2, and others) seem to be most reliable; armv8 (Raspberry Pi3) are in the weeds, so to speak, because there’s been little effort toward that architecture due to resources. It will probably work in the future, just not as well in June, 2016. Now that you’ve been adequately warned, let’s begin.
[NB: If you’re setting up a new system, start over on Part 1: Readying Your Pi for Swift]
Contents
- Making a Swapfile
- Installing required components
- Getting and building the source
- Cross compiling
- Conclusion
Make a Big Ol’ Swapfile
- You’ll need to have a lot of memory to compile swift, and while the Raspberry Pi has 1GB, it’s not enough. Let’s start with increasing the swapfile size by following the from over here. (Paraphrased below)
Edit the configuration file at /etc/dphys-swapfile
sudo nano /etc/dphys-swapfile
Find CONF_SWAPSIZE and set the value to 2048 :
CONF_SWAPSIZE=2048
Reboot or stop/start the dphys-swapfile service
sudo /etc/init.d/dphys-swapfile stop
sudo /etc/init.d/dphys-swapfile start
It may take several minutes, so be patient.
One point some have noted is that having a large swapfile as this lends to decreasing the lifespan of the memory card due to the large amount of writes you’d expect in a swapfile. It’s a risk you run, but 32GB memory cards are inexpensive. Keep backups if it concerns you
Required Components
Next, we need to install required components (CMAKE, ninja, & other dev tools) – from the Swift README
sudo apt-get install git cmake ninja-build clang uuid-dev libicu-dev icu-devtools libbsd-dev libedit-dev libxml2-dev libsqlite3-dev swig libpython-dev libncurses5-dev pkg-config
Once that is finished, clone Joe Bell’s package-swift repo on your Pi. This provides some handy shortcuts for building swift on ARM devices: https://github.com/iachievedit/package-swift.git
Start a new screen session so that we don’t have to remain logged in during the whole build (in other words, if you lose your connection, you can resume where you left off)
screen -S swift
To resume the screen session, simply log back in and type
screen -r swift
Get and Build the Source
Inside the Package Swift repo, run the get script to download the appropriate repos used for arm builds
./get.sh
./package ~/swift | tee ~/swift/build-log.txt
or (it doesn’t really matter much)
./swift/utils/build-script --preset=buildbot_linux_armv7 install_destdir=~/swift/Swift-3.0-ARM/install installable_package=~/swift/Swift-3.0-ARM/swift.tar.gz | tee ~/swift/build-log.txt
Just one note – notice the tee command at the end. That takes the input and write it to a file. Since the Swift build process doesn’t output build logs, we pipe the build output to tee so we can save it, in case there was an error along the way. Sometimes these errors are minor and occur after the swift binaries successfully build. It’s important to know.
Now, it’s time to wait several hours for first build. You remember to enter a screen session, right?
When it’s all said and done, you should be able to run swiftc on a simple helloWorld.swift
~/swift/usr/bin/swiftc helloWorld.swift && ./helloWorld
Cross-Compiling
Attempting to build Swift on these low-powered devices is a noble effort, but it takes a very long time. I personally don’t like having to wait several hours to find out the build failed. That’s where cross-compiling comes in. This process means you build binaries on one platform (for example, a Mac/Intel) that work on another (Linux/armv7). Usually takes less than an hour. The following instructions are meant to be executed on a Mac.
First, you need to install dpkg so the build system can create a proper debian package
brew install dpkg
Next, make sure you have Joe Bell’s Package Swift repo, mentioned above: https://github.com/iachievedit/package-swift.git
Download all the appropriate repos and branches using ./crosscompile_get.sh
Next, it’s time to build: ./crosscompile_build.sh -t linux-armv7
When the build is complete, copy it over to your Pi. If all went well, you should have functioning Swift binaries*.
*Of course, there may still be issues with Swift on ARM itself – it’s still alpha.
Conclusion
I hope this tutorial was helpful. At the time of this writing, there were still several considerable issues with Swift on ARM devices, but it is possible to compile it yourself. If you continue to run into issues, it may be worthwhile to check back at Joe’s Website for updates and downloadable binaries.
Ready Your Raspberry Pi for Swift
I’m working on a series in conjunction with some talks I’m giving this spring/summer at the All Things Swift meetup here in San Diego. As one might expect, many Swift developers don’t have much linux experience. That’s perfectly fine – it doesn’t take a much to get started. I even come back to this setup process every time I set up new Raspberry Pis. Everything here assumes a Raspberry Pi 3 with Raspbian Jessie. Otherwise YMMV.
Before we get started, I’ll add this one note – Swift is under heavy development right now. Joe Bell has created a Swift-2.2 Debian package (below), and a number of people are working hard on Swift-3.0 for ARM devices. Development on Swift-2.2 has ceased in favor of bringing Swift-3.0 up to speed. Only recently has anyone been able to compile Swift on a somewhat consistent basis. There’s a good chance that within a few months many of the issues will be worked out.
Connecting
First, let’s make connecting our Pi a bit easier – install VNC and Bonjour (netatalk + avahi). The former enables screen sharing, and the latter allows you to connect to your Pi at an address such as vnc://pi.local/ on your local network – much easier than remembering an IP address. Contributor fguillen posted a concise set of instructions on StackOverflow. Rather than re-hash his instructions, head over there. Remember to reboot the Pi when you’re finished (sometimes VNC doesn’t work properly without it).
If during setup, you did not change the default hostname, you can now connect to your Pi at vnc://pi@raspberrypi . If you’d like to change it, as I did, you can run the raspi-config tool (via the GUI or command line). By running raspi-config, all the necessary config file changes are made for you.
At this point there’s little reason to keep the Pi connected to a monitor or TV. My next step is to stash it away somewhere out of the way so I can clear up some desk space. From now on, I’m connecting to the pi at ssh pi@pi.local .
.
Cut the Fat
If you plan on compiling Swift on your Pi (more on that another day), you’ll need at least a 16GB memory card. If you’re on the lower end, you may need to remove some extra cruft. Let’s start with LibreOffice, Mathematica, and Wolfram.
sudo apt-get autoremove mathematica* libreoffice* wolfram*
Swift via apt-get
The easiest way to get swift running on your RPi is to install Swift 2.2 via apt-get. There are several steps involved, but Joe Bell laid them out well. Follow them, but with a few important changes:
The rcn-ee debian packages have been updated, so use this instead:
wget http://repos.rcn-ee.com/debian/pool/main/r/rcn-ee-archive-keyring/rcn-ee-archive-keyring_2016.04.24~bpo90+20160424+1_all.deb
sudo dpkg -i rcn-ee-archive-keyring_2016.04.24~bpo90+20160424+1_all.deb
echo "deb [arch=armhf] http://repos.rcn-ee.com/debian/ jessie main" | sudo tee --append /etc/apt/sources.list
sudo apt-get update
Go ahead and complete his instructions. When you’re finished, you’ll have a working Swift-2.2 installation.
There’s something important you need to know – the Swift REPL doesn’t work (yet). Neither does the Swift Package Manager. While you won’t be able to use any libraries that come via SwiftPM, you can still write some simple apps using Foundation and Glibc.
Let’s try a very simple Hello World…
print("Hello ?")
Compile and run…
swiftc helloWorld.swift && ./helloWorld
Finally! Doesn’t it feel great to see something familiar running outside the Walled Garden?
I mentioned compiling Swift from source above. That will come another time – certainly more involved than I intended for this post.
Currently, Swift on Raspberry Pi3
I’ve taken recent interest in working on the Raspberry Pi now that Swift is open source. Given the amount of products built specifically for the Pi, there’s a huge potential for new, fun projects. DIY electronics have been gaining momentum over the last few years and there’s a lot of information to help you get started. Depending on how things go in the coming months, I may be able to start pitching physical computing devices for client projects.
At the time of this writing (April 2016), there’s not much to be said about getting Swift working properly on devices like the Raspberry Pi. While a few individuals have made great headway into making swift compile for linux arm7, the work isn’t complete and a few critical pieces are missing. Even now, not a lot of progress has been made since January, when it all started to work.
To put it simply this is what does and does not work. Set your expectations accordingly.
- A build of Swift 2.2 “works” – you can compile and link to Foundation + Glibc
- That build is from February, 2016
- The Swift REPL doesn’t work – crashes with a memory bug
- Full set of Swift3 tools don’t compile (yet)
Getting Started
I’m using a Raspberry Pi3 running the latest Raspbian Jessie. Head over to Joe Bell’s instructions for the Raspberry Pi and follow them exactly. This will give you a workable Swift 2.2 install via apt-get. I’m sorry there aren’t more exciting instructions here, but that’s really the crux of our predicament – that seems to be the only reliable way to get swift running on the Pi for now.
Once you have Swift properly installed, give some examples a try (scroll down) – using Foundation and Glibc. It feels good to see Swift running on something other than an iPhone or Mac.
Next Steps
I’m currently working with (I use that word loosely – I don’t have the knowledge to be a productive contributor) with Joe Bell, Will Dillon, and Morris Cornell-Morgan to see if we can figure out what how we can get builds working for the Pi and other armv7 devices.
I had the most success attempting to compile Swift on the Pi in over a month last night – this happened to be within just a day or so of the main Swift repo switching over to swift-3.0 development. Most of the tools appeared to compile fine, but package manager failed, and there were some issues with linking (this could be a build config issue). I remain hopeful.
I’ll continue to post progress as it comes. In the meantime, I’m preparing a talk on this subject at the All Things Swift meetup in May.
EDIT April 27, 2016: Joe is putting together a concerted effort to get Swift3 on the Pi.He’s also provided a Jenkins build workflow to test integrations.
Not Forgotten
It’s been a while since I blogged here regularly. I have the best of intentions, but with life being what it is, I rarely think about it, much less take the time or have the energy to do it. I’m reminded that I do this for us – for me and for you. From time to time I actually come back to this blog and find solutions to answers I’ve long forgotten. For you, I write this all down so that maybe you have an easier time finding the correct path than I did.
Expect to see more from me. I don’t mean to imply I’m becoming a prolific writer, but this has been a very small snapshot of my professional life over the years. I don’t intend on letting that go easily.
Apps As Art
We seem to be on a roll again about this whole “indie is not viable” discussion. Next up, Allen Pike on Supply-Side Blues.
If you haven’t read them yet, I posted a couple other articles on this topic [see indie].
Allen’s post is spot-on with my assessment – the AppStore is becoming much like the music industry. Heck, when I was 16, I wanted to play professional saxophone. I might have actually had the chops to do it. At one point I started considering what my career outlook would have been. I noticed my saxophone teachers all had one thing in common – playing wasn’t their main source of income (or probably not; one guy played broadway shows in LA, but even that was inconsistent as shows come and go all the time). Average salaries were low.
Let’s look at another music angle. I have a family member with a reasonably good shot at making it big in the industry, but even then the sacrifice is large for an unknown, and certainly unrealized, payoff. Pick your poison – take a “real job” and do the things you love when you have time in the evenings, or go for it and make peanuts until (if) you make it big.
That’s why this whole thing is bananas. Apps are becoming art in much the way we approach music. And here’s the kicker – as indies, we LOVE to emphasize the care we put into the craft – paying attention to every detail, making it perfect. Tell me that doesn’t sound like something you’ve read on Etsy!
Friends, the gold rush is over, and we’re in this strange, mature, creative industry now. Customers expect loads of great things for free, we do it because we love it and have no expectation of making it big, and the only real money for most of us is taking that other job that actually pays. You know, that one converting CSV files for the sales team.
But you know what – it’s not going to stop me. I will keep on keepin’ on.
The AppStore Ice Cream Truck
Charles Perry (no relation), wrote this follow-up to Brent Simmons’ Love post (app store, indies, etc).
Here’s the question I posted to Charles – Does it change if the ice cream truck is the only one you’re allowed to sell on, yet the entire menu is only the top-sellers?
@mistercameron The App Store only features a tiny fraction of apps. We need to put up billboards advertising our “ice cream”. Marketing!
— Charles Perry (@DazeEnd) July 2, 2015
Sure – don’t blame the delivery truck, but there is significant impact when your product is effectively hidden from view. (How many times have you searched for the exact app title to be presented with dozens of unrelated results?).
Advertising is the obvious answer, and I think that has been the answer for years. I struggle with doing it right. How, where, and how much are all questions I don’t know the answers to. When bootstrapping something and your team is small, it’s a tough sell to spend money on things that may not have a direct correlation to income. BUT how else will people find out about our apps?
We (indies – I count myself as such, though I’m not making a living off it), need to figure this business out. Apple isn’t going to come to our rescue. They’re just the BigBoxRetail of apps. We need to do a better job getting the word out. More traditional advertising channels? Sure. Is there any reasonable way for us as a community to go about educating the average Joe and Jane that AppStore.app isn’t the only (or best) way to find apps? Actually, I wonder if they even care. See my previous post – perhaps the craft and quality movement will creep into digital.
Stay tuned. I hear the ice cream truck coming.
In the meantime a shameless plug: Have you heard about my latest project, Pocket Coach Pro? If you’re interested in getting fit (and I’m not talking about turning into a Hollywood six-pack… just about getting in shape and staying in shape – for your own health), then this app might be the one for you. Go, sign up, and you’ll be on my no-spam mailing list where I will send occasional development updates, take sign ups for beta testing, etc.
Indie Love
Is going indie on iOS viable? Nope. Don’t bother.
First, by Brent Simmons: http://inessential.com/2015/06/30/love
Then, Gruber follows: http://daringfireball.net/linked/2015/06/30/the-love-era
Hit the nail on the head. I have an app currently in development that might have a reasonable chance of doing OK, but I can’t see making my entire living off of it. Sounds great, huh? Here’s the thing – this is a concept I believe in (health), coupled with something I love to do – develop apps that I conceived. To try out-competing megacorp is foolish, but nothing says you can’t have a slice of the pie AND have fun doing it.
One thing I’m reminded of is how I sense parallels to the music industry (or any creative art, for that matter). We do what we do for the love of doing it. Few artists can make a full-time living off the art, but I don’t see that stopping them. Do it because you love it and because some people appreciate it. A few make it big, but not making it shouldn’t matter. That’s where Brent’s most poignant remark comes, “If there’s a way out of despair, it’s in changing our expectations.” True of everything in life, right? It’s often how you respond to circumstances rather than the circumstances you experience that matters.
Let me wonder this – we (Americans, at least) enjoy the big apps from well-known companies. The names sell themselves. Congratulations to them – that’s no easy task. We’re taking another turn. Things like the foodie movement, farm to table, hand-crafted goods, rejection of the mass-produced, etc are surging farther and farther into our society. We have a millennial spirit of idealism that may end up working to our favor. Will “hand-crafted apps” follow? Maybe. I mean, I don’t know if they actually will, but possibly there’s a chance, and I can hope they will.
So, if I may suggest – do it for the love. Any other benefit that comes of it is bonus.
iBeacons In Real Life
The State of iBeacons (June 2015)
This is pretty consistent with my experiences. On observation I’d add about squirrely RSSI values – readings walk around a bit. You’ll do better to calculate a moving average and toss out the occasional 0 reading. Also be mindful of your iBeacon’s power settings – you may need to calculate your own distance from the RSSI value if the device isn’t transmitting at the default power expected by iOS. Even so, distance may not be entirely accurate. Take it with a grain of salt.